
Gluten-free cake with heart
Do you want to make a homemade treat for Valentine’s Day? Then you really have to try this gluten-free cake with a heart in the middle.
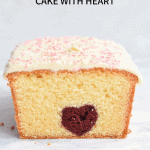
From the outside, this cake looks like an ordinary vanilla cake, but when you cut it open, a red heart appears. How fun is that!
How to make the hidden heart vanilla cake?
Making this cake is not difficult at all. It does take a little more time than making a regular gluten-free vanilla cake. This is because you need to bake two cakes for this recipe.
You first make a gluten-free chocolate cake that you color red with food colouring. Use a cookie cutter to cut red cake hearts from this.

Then you make the batter for a gluten-free vanilla cake. You partly put this batter in the baking tin and then place the cake hearts in the middle of the cake tin.
Pour the rest of the batter around it. This is how you bake a cake with hearts in the middle.
Then you can decorate the outside of the cake with a nice frosting or glaze and your Valentine’s surprise is ready!

Make the cake the other way around
Would you rather make a chocolate cake with a red heart of vanilla cake in the middle? That is of course also possible. First make the vanilla cake and add the food colouring to it. Cut out the hearts with a cutter.
Then make the batter for the chocolate cake and place the red vanilla hearts in the middle.
What to do with the leftover cake?
If you cut out the hearts, you will of course be left with some of the chocolate cake and it would be a shame to throw it away. If you cut at least 3 to 4 hearts out of each slice of cake, you will have minimal leftover cake crumbs. You can just cut the leftover cake into slices and eat it.
What might be even more fun to do is crumble this red cake and turn it into cake pops! Cake pops are cake balls on a lollipop stick. You mix the crumbled cake with frosting and roll it into balls.
Dip these in melted chocolate and then you have a delicious cake snack!
You can decorate these with sprinkles and you have another very nice Valentine’s treat. You can find the recipe for gluten-free cake pops here.

Storing the cake
You can keep the baked cake for a week. Wrap it airtight in aluminum foil, plastic wrap or in a cake box. Keep the cake out of the refrigerator.
You can also freeze the cake in slices in an airtight container. Then it stays good for about 3 months. This works best for a cake without frosting.
Will you let me know if you have made my gluten-free cake with heart? I would love it if you would let me know what you think about the recipe by leaving a comment and a rating below. You can also share your creations with me by tagging me on Instagram @karlijnskitchen or by using the hashtag #karlijnskitchen.


Gluten-free cake with heart
- Total Time: 150 min
- Servings: 12 1x
- Diet: Gluten Free
Description
A very fun recipe: a gluten-free cake with a red heart on the inside as a surprise! Perfect for Valentines day. Low FODMAP and with lactose-free option.
Ingredients
For the hearts
- 225 g soft butter or milk-free margarine
- 225 g granulated sugar
- 250 g gluten-free flour mix (I use Schär Mix It Universal)
- 40 g cocoa powder
- 16 grams baking powder
- A pinch of salt
- 4 eggs, at room temperature
- 1 tsp vanilla extract
- 1–1.5 tsp red food coloring
- A 9 inch loaf tin (23 x 13 cm)
- A heart-shaped cookie cutter
For the vanilla cake
- 225 g soft butter or milk-free margarine
- 225 g granulated sugar
- 275 g gluten-free flour mix (I use Schär Mix It Universal)
- 16 grams baking powder
- A pinch of salt
- 4 eggs, at room temperature
- 1 tsp vanilla extract
Frosting (optional)
- 100 g butter, at room temperature
- 150 g lactose-free cream cheese
- 1/2 tsp vanilla extract
- 100 g icing sugar
- Optional: sprinkles
Instructions
For the hearts
- Preheat the oven to 180 degrees Celsius (350 F). Line the loaf tin with baking paper.
- Cream the butter with the sugar.
- Add the vanilla extract and eggs one at a time, mixing in between each time.
- In another bowl, combine flour, cocoa, baking powder and salt and mix together.
- Add this little by little to the wet ingredients while continuing to mix.
- Finally, add the red food colouring and mix until you have an even red batter.
- Pour the mixture into the cake tin and use a spatula to smooth it out.
- Bake the cake in the oven for 55-60 minutes. Keep a close eye on the cake during baking, if the cake darkens too quickly, you can cover it with some baking paper. Check after about 50 minutes if the cake is already done. It can vary per oven how long the cake needs exactly. The cake is done when a skewer comes out clean.
- Remove the cake from the oven and let it cool in the tin for a few minutes. Then take it out of the mold and let it cool completely.
- Cut the cake into slices as thick as your heart cutter.
- Cut out hearts from the cake slices with the cutter. You can get at least 3-4 hearts from each slice if you use a similar size cookie cutter as I did.
For the vanilla cake
- Repeat the above steps for the vanilla cake. You now only omit the cocoa powder and use 25 grams more gluten-free flour mix. See the ingredients for the vanilla cake.
- You also skip the step where you add colouring to the batter, because we are now making a regular vanilla cake.
- Spread a thin layer of batter over the cake tin.
- Now take the hearts and place them in a row in the middle of the cake tin. Make sure they fit well at the edges and the hearts are tight against each other.
- Divide the rest of the batter around the hearts. Make sure they are completely covered and out of sight.
- Smooth the batter with a spatula.
- Bake the cake in the oven for 55-60 minutes. Also keep an eye on this cake in the oven and cover it with baking paper if necessary.
- Remove the cake from the oven and let it cool in the tin for a few minutes. Then take it out of the mold and let it cool completely.
- And voilà, your vanilla cake with heart is ready! Got any leftovers from the red chocolate cake? Then you can just eat them or make cake pops with the leftovers. I will share a recipe for that next week.
For the frosting
- This cake is delicious without frosting, but if you like you can decorate the top of the cake with a layer of frosting. I made cream cheese frosting for this.
- Beat the soft butter until fluffy and creamy.
- Then add the cream cheese and vanilla extract and mix until fluffy.
- Add the powdered sugar little by little.
- Use a spatula to spread the frosting over the top of the cake.
- Optional: sprinkle some sprinkles on top.
Notes
*For the FODMAP diet, a little milk chocolate is not a problem, but if you eat strictly lactose-free, make sure you use lactose-free sprinkles. It is also better to omit the frosting, because it contains butter or make a lactose-free frosting. The cakes can be made with lactose-free margarine instead of butter. Butter is allowed on the FODMAP diet.
- Prep Time: 30 min
- Cook Time: 120 min
- Category: Bakken
- Method: Oven
- Cuisine: International
Together we go for a calm belly!
Subscribe to the Karlijn's Kitchen e-mail newsletter for more tips and recipes and receive the ebook 10 things I wish I had known when I started the FODMAP diet for free!