
Low FODMAP naked cake with lemon and blueberries
Since a month, I am totally crazy about naked cakes. I started noticing them on Instagram en Pinterest (late discovery, I know haha) and I think they are soo pretty. I am not a big fan of over-the-top cakes with lots of decorations or layers of fondant. So the more I loved the naked cake style. Only minimalistic decorations and they look fantastic. I knew that I had to give this a try too. For my birthday I got some cake decoration tools and for the party that I hosted a few weeks after, I made my very first low FODMAP naked cake.
It took quite some time, but the result was totally worth it. I started off with a slight failure: a cake that was totally liquid on the inside, but my second try with a different cake recipe turned out perfectly. A beautiful cake (if I may say so) that I am proud of. I think that I found a new hobby! I made a cake with a hint of lemon, a lemon buttercream and fresh blueberries.
Because I wanted to do the cake decoration right, I got some cake decoration tools. These are the tools that I used for the decoration of the cake:
- A turntable. You can put the cake on the turntable and easily turn it around to make decorating easier.
- A straight spatula. I use this spatula for applying the frosting to the cake.
- Cake circles. You put these circles on the turntable and place the cake on top when you start decorating it. The cardboard circle makes it easy to transfer the cake to a cake stand after decorating.
- A bench scraper. You use the bench scraper to smooth out the frosting on the sides of the cake.
(these links are affiliate links, click here to read more about affiliate links and why I use them)
I can also advise you to watch this instruction video from Sally’s Baking Addiction (scroll a bit down in the blog). In this video Sally shows you how to assemble and decorate a naked cake. I am a big fan of Sally’s blog and her baking challenge in march convinced me to make this cake. She is a huge inspiration to me.

What do you need (for 16 – 18 servings)
For the cake
- 450 g soft butter (you can also use lactose-free butter or margarine)
- 450 g white sugar
- 8 eggs, at room temperature
- 8 tbsp lactose-free milk
- 550 g gluten-free flour
- 32 g baking powder
- A pinch of salt
- Zest of 1 lemon
- An 8-inch cake tin (or 3 cake tins of that size, if you want to make all layers at the same time)
For the lemon buttercream
I used this recipe from Sally’s baking addiction (but everything x 1.5)
- 345 g soft butter
- 810 g confectioners’ sugar
- 4 tbsp lemon juice
- 3 tbsp lactose-free heavy cream
- zest of 1 lemon
- pinch of salt
For the decoration
- Blueberries
- Strawberries
- Flowers (I used white roses)
How to make the low FODMAP naked cake with lemon
- Pre-heat the oven to 175 degrees Celsius (350 F). Grease the cake tin with butter and layer with baking parchment.
- The cake: beat the butter and the sugar together until soft and creamy. Add the eggs one by one and mix after every egg. Add the lactose-free milk and the lemon zest and mix again.
- Put the flour, baking powder and salt together and add this to the batter little by little while you continue to mix.
- I only had one 20 cm cake tin, so I baked the layers of the cake one after the other. It is important that the layers of the cake have the same thickness. It is best to weigh the batter, so you get equal layers. I had 2000 gram batter, so each layer was about 666 gram.
- Pour the batter for one layer into the cake tin and level with a spatula. Bake the cake in the oven for 45-55 minutes.
- I notice that gluten-free cake batter always darkens quickly. So I covered the cake with aluminium foil after 15 minutes of baking. It is important to check if the cake is done. Gluten-free cake usually needs some more time than normal cake and this can differ per oven. Even after 55 minutes the cake might need a few more minutes. The cake is done when a toothpick comes out clean.
- Take the cake out of the oven. Leave to cool in the tin. Remove the cake from the tin and leave to cool completely. Repeat this for the other two layers.
- Make sure the cakes have cooled down completely when you start decorating. Because gluten-free cake can be a bit more crumbly than normal cake, this is very important. I made the cakes the day before and I stored them in the fridge overnight. After that they were perfect to work with.
- The frosting: Mix the soft butter for two minutes with a handmixer or in a standmixer until fluffy. Add lemon juice, cream, lemon zest, a pinch of salt and the powdered sugar little by little while you keep mixing on low speed. Continue until all ingredients are mixed well. Increase to high speed and continue to beat for another 3 minutes.
- Assembling the cake. Make sure all layers are flat. You can use a large serrated knife to slice a thin layer off the tops of the cakes if they are not entirely flat. Place a cake layer on your turntable. Use a spatula to spread a layer of butter cream over the cake. Make a circle of blueberries around the rim of the cake. Press them slightly into the frosting to make sure you they are all even, otherwise your cake won’t be straight. Place the second layer on top of the first layer, spread the butter cream over the cake and make another circle of blueberries. Place the third layer on top. Use your spatula to spread butter cream over the top of the third layer and all around the sides of the cake. You can use a bench scraper to smoothen the sides of the cake.
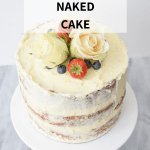
- Decorate the cake with decorations of your choice. I used strawberries, blueberries and white roses.
- Refrigerate the cake until you serve it. If you put the cake in the fridge for more than a few hours, it is best to cover it with some plastic wrap.
Tips
- You can make both the cake and the frosting one day before assembling the cake. Store it in the fridge.
- Do you have left-over frosting? You can freeze this and keep it in the freezer for about 3 months.
- Left-over cake can be stored in the fridge for a week. If you have a lot of left-overs you can also freeze it.
Enjoy!
Will you let me know if you make my low FODMAP naked cake with lemon? I would love it if you would share your creations with me using the hashtag #karlijnskitchen on Instagram or by tagging me at @karlijnskitchen.


Low FODMAP naked cake with lemon and blueberries
- Total Time: 5 hours 45 mins
- Servings: 16 1x
Description
A low FODMAP naked cake! A stunning naked cake with lemon that will do great on a party. The cake is made with three layers of lemon cake with a lemon butter cream frosting and blueberries. Decorated with fresh fruit and flowers. This cake is also entirely gluten-free.
Ingredients
- For the cake
- 450 g soft butter (you can also use lactose-free butter or margarine)
- 450 g white sugar
- 8 eggs, at room temperature
- 8 tbsp lactose-free milk
- 550 g gluten-free flour
- 32 g baking powder
- A pinch of salt
- Zest of 1 lemon
- An 8-inch cake tin (or 3 cake tins of that size, if you want to make all layers at the same time)
- For the lemon buttercream
- I used this recipe from Sally’s baking addiction (but everything x 1.5)
- 345 g soft butter
- 810 g confectioners’ sugar
- 4 tbsp lemon juice
- 3 tbsp lactose-free heavy cream
- zest of 1 lemon
- pinch of salt
- For the decoration
- Blueberries
- Strawberries
- Flowers (I used white roses)
Instructions
- Pre-heat the oven to 175 degrees Celsius (350 F). Grease the cake tin with butter and layer with baking parchment.
- The cake: beat the butter and the sugar together until soft and creamy. Add the eggs one by one and mix after every egg. Add the lactose-free milk and the lemon zest and mix again.
- Put the flour, baking powder and salt together and add this to the batter little by little while you continue to mix.
- I only had one 20 cm cake tin, so I baked the layers of the cake one after the other. It is important that the layers of the cake have the same thickness. It is best to weigh the batter, so you get equal layers. I had 2000 gram batter, so each layer was about 666 gram.
- Pour the batter for one layer into the cake tin and level with a spatula. Bake the cake in the oven for 45-55 minutes.
- I notice that gluten-free cake batter always darkens quickly. So I covered the cake with aluminium foil after 15 minutes of baking. It is important to check if the cake is done. Gluten-free cake usually needs some more time than normal cake and this can differ per oven. Even after 55 minutes the cake might need a few more minutes. The cake is done when a toothpick comes out clean.
- Take the cake out of the oven. Leave to cool in the tin. Remove the cake from the tin and leave to cool completely. Repeat this for the other two layers.
- Make sure the cakes have cooled down completely when you start decorating. Because gluten-free cake can be a bit more crumbly than normal cake, this is very important. I made the cakes the day before and I stored them in the fridge overnight. After that they were perfect to work with.
- The frosting: Mix the soft butter for two minutes with a handmixer or in a standmixer until fluffy. Add lemon juice, cream, lemon zest, a pinch of salt and the powdered sugar little by little while you keep mixing on low speed. Continue until all ingredients are mixed well. Increase to high speed and continue to beat for another 3 minutes.
- Assembling the cake. Make sure all layers are flat. You can use a large serrated knife to slice a thin layer off the tops of the cakes if they are not entirely flat. Place a cake layer on your turntable. Use a spatula to spread a layer of butter cream over the cake. Make a circle of blueberries around the rim of the cake. Press them slightly into the frosting to make sure you they are all even, otherwise your cake won’t be straight. Place the second layer on top of the first layer, spread the butter cream over the cake and make another circle of blueberries. Place the third layer on top. Use your spatula to spread butter cream over the top of the third layer and all around the sides of the cake. You can use a bench scraper to smoothen the sides of the cake.
- Decorate the cake with decorations of your choice. I used strawberries, blueberries and white roses.
- Refrigerate the cake until you serve it. If you put the cake in the fridge for more than a few hours, it is best to cover it with some plastic wrap.
Notes
You can make both the cake and the frosting one day before assembling the cake. Store it in the fridge.
Do you have left-over frosting? You can freeze this and keep it in the freezer for about 3 months.
Left-over cake can be stored in the fridge for a week. If you have a lot of left-overs you can also freeze it.
- Prep Time: 3 hours
- Cook Time: 2 hours 45 mins
4 Comments
I love the new look to your blog! It’s really slick!
I’ve been noticing more of those kinds of cakes on Instagram too, and now I know what they are! Yours is absolutely gorgeous! Cake decorating is a skill I have zero knack for, so I’m really impressed when I see people who can do it well!
Thank you Joyce! I must say I never thought I had it in me either. I have never seen myself as creative, but I thought I’d just give it a try. And practice makes perfect right 🙂
WOW this cake looks and sounds so delicious!
Thank you Kimberly!