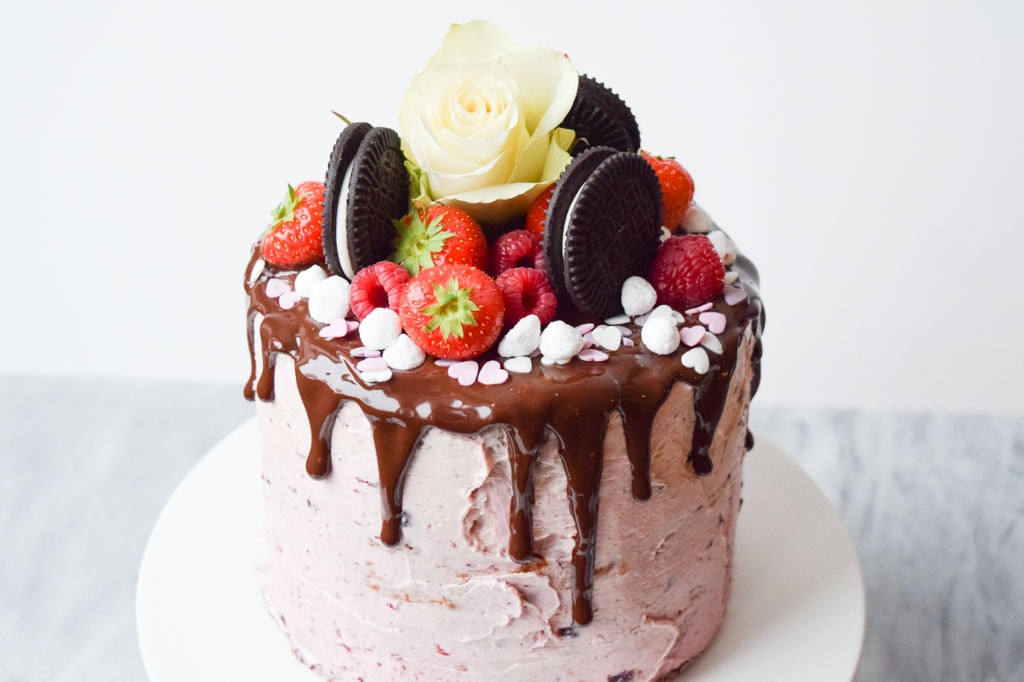
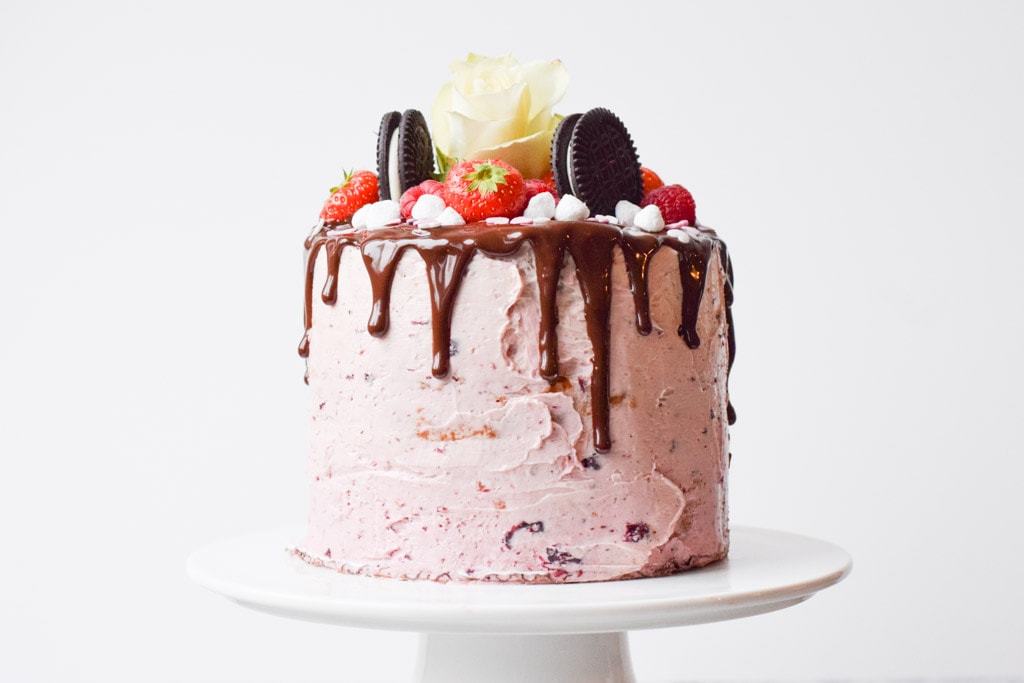
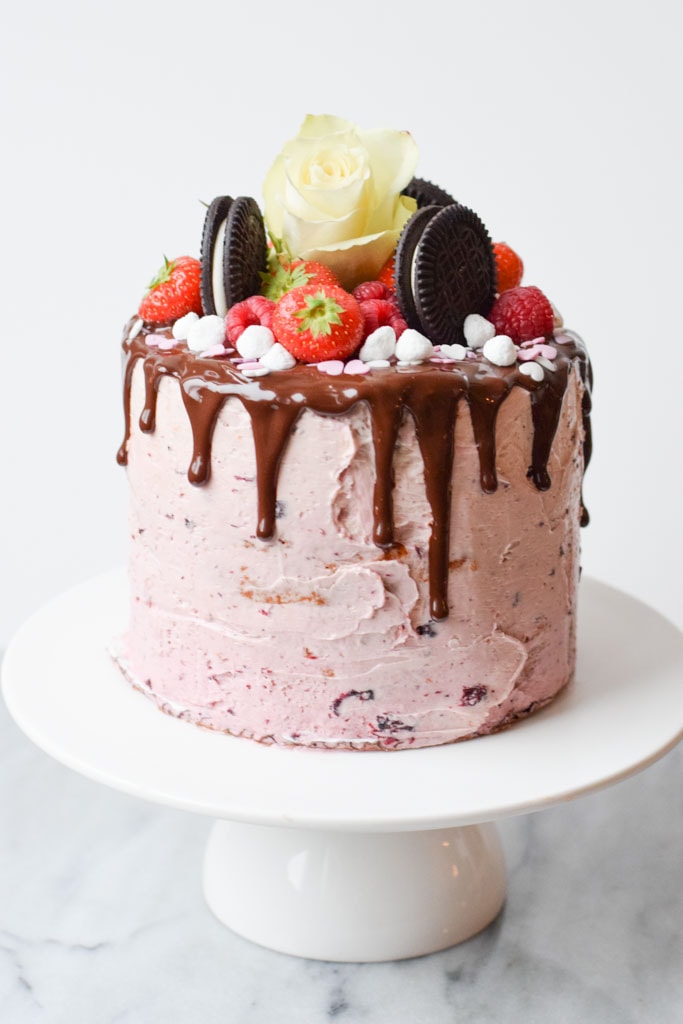
Gluten-free drip cake
I love making special cakes and therefore I wanted to share a recipe for a gluten-free drip cake for Valentine’s day. A cake consisting of three layers vanilla cake with a blueberry buttercream, a chocolate drip and toppings. This recipe is not very IBS proof. All ingredients of the cake are low FODMAP, but the cake contains a lot of sugar and fat and that makes it quite a heavy cake for your stomach. If you can deal with sugar and fat well, it won’t be a problem, but if you are sensitive to this, you really have to stick to a small piece. Not that you will manage to eat a large piece of this cake anyway, it is too heavy for that 😉 I just really wanted to share a recipe for an over the top cake with you!
I really started to like baking layer cakes, so I will definitely experiment more with cakes like these and try to make them with a little less butter and sugar. Maybe you will see these experiments on the blog some time!
It will take a few hours to make this gluten-free drip cake. Especially when you don’t make layer cakes often like me. To spread the work a little, I advise to bake the cakes one day beforehand. You can store the cakes in the fridge overnight and the next day you can decorate the cake.
The tools for the gluten-free drip cake
I use several tools for building and decorating the cake:
- A turntable. You can put the cake on the turntable and easily turn it around to make decorating easier.
- A straight spatula. I use this spatula for applying the frosting to the cake.
- An offset spatula. Sometimes I prefer using an offset spatula instead of straight one.
- Cake circles. You put these circles on the turntable and place the cake on top when you start decorating it. The cardboard circle makes it easy to transfer the cake to a cake stand after decorating.
- A bench scraper. You use the bench scraper to smooth out the frosting on the sides of the cake.
- A candy thermometer for the Swiss meringue buttercream.
These links are affiliate links, click here to read more about affiliate links and why I use them.
Will you let me know if you have made this gluten-free drip cake? I would really like to hear what you think and see your creations!
Gluten-free drip cake
- Total Time: 5 hours 35 mins
- Servings: 12 1x
Description
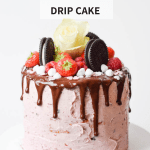
A delicious gluten-free drip cake! Vanilla cake with blueberry frosting and a chocolate dip. This layer cake is low FODMAP, gluten-free and lactose-free.
Ingredients
For the cake
- 340 g (1 1/2 cups) soft butter
- 340 g (1 2/3 cups) granulated sugar
- 6 eggs, at room temperature
- 6 tbsp lactose-free milk
- 1 tsp vanilla extract
- 410 g (3 1/4 cups) gluten-free self-raising flour
- A pinch of salt
- 3x 6-inch (15 cm) cake tins (I only have two, so I baked the first two layers first and the last one separately)
For the meringue buttercream
- 120 ml (1/2 cup) egg whites (I used 4 egg whites from medium-sized eggs)
- 200 g (1 cup) granulated sugar
- 340 g (1 1/2 cups) soft buttter
- 1 tsp vanilla extract
- 2–3 tbsp blueberry jam (make sure no high FODMAP ingredients are added) + extra to put in between the cake layers
- A candy thermometer
For the chocolate drip
- 150 g (5.4 oz) dark chocolate
- 150 ml (2/3 cup) lactose-free whipping cream
- A cube of butter
For decoration
- Strawberries
- Raspberries
- White roses
- Gluten-free & low FODMAP double cookies (Oreo’s)
- Heart sprinkles or other decoration of your choice
Instructions
For the cake
- Pre-heat the oven to 175 degrees Celsius (350 F). Grease the cake tins and line them with baking parchment.
- Mix the butter and the sugar creamy. Then add the eggs one by one while you mix in between. Add the lactose-free milk and the vanilla extract and mix again.
- Put the self-raising flour and the salt together in a bowl and add this to the batter little by little, while you keep mixing. Mix until you have a smooth batter.
- Divide the batter over the three cake tins. It is important that your layers have the same height, so use an equal amount of batter for each layer. I used 450 gram of batter in each cake tin.
- Smoothen the batter in the cake tins with a spatula. Bake the cakes for about 30-35 minutes until a toothpick comes uit clean. Depending on how many cakes you bake in the oven at a time, it might take longer or shorter until the cakes are done.
- Remove the cakes from the oven and leave to cool down in the tin. When almost cold, you can remove them from the tins and leave them to cool down completely. Make sure that the cakes are not warm anymore when you start decorating.
The buttercream
I used this recipe from Style Sweet CA
- While the cakes are cooling down we can make the buttercream. Split the eggs and make sure that you don’t get any egg yolk in the egg whites. You need 120 ml of egg whites.
- Mix the egg whites together with the sugar in a glass bowl. If you have a standmixer, use the bowl of your standmixer (if it is heat-proof). Just mix the egg whites and the sugar together shortly You are going to heat the egg whites and you don’t want them to start cooking.
- Fill a pan with a layer of water and bring it to a simmer. Place the glass bowl on top of the pan. The water should be kept at a simmer and should not touch the bottom of the glass bowl.
- While stirring regularly, heat the egg white mixture until it reaches a temperature of 68-70 degrees Celsius (155-160 degrees Fahrenheit). I use a candy thermometer to measure the temperature. The mixture should be very warm and the sugar should have dissolved.
- Carefully remove the bowl from the pan. Put it under your standmixer or if you don’t have a standmixer, grab your handmixer. Beat the mixture on high speed for about 8 minutes. When it is done the meringue should be shiny and stand in medium-stiff peaks. The bowl should have cooled down to room temperature.
- Set the mixture to low and begin adding in the butter, a few small chunks at a time. Make sure the butter is at room temperature.
- Once all the butter has been mixed in, add the vanilla extract and 2 tbsp of blueberry jam.
- Turn up the mixer to medium speed and mix until your buttercream is silky smooth. This might take a few minutes.
Building the cake
- Make sure that the three layers of cake are all flat. Trim off the top with a serrated knife, so all layers are flat and equal. Put one layer of cake onto your turntable. Divide a tablespoon of blueberry jam on top. Leave the edges free.
- Then divide a layer of buttercream over the cake layer. Start and the edges and work towards the middle.
- Put the second cake layer on top of the frosting and divide a tablespoon of jam over it. Repeat with a layer of buttercream. Then put the final layer of cake on top.
- Now we are going to do the crumb coating. Carefully spread a thin layer of buttercream on the top of the cake and around the sides. Put the cake into the fridge for at least 15 minutes, so the crumb coating can set.
- Depending on how dark you want your frosting on the outside of the cake to be, you can add another tablespoon of blueberry jam to the buttercream.
- Cover the top and the side of your cake with buttercream using your spatula. When the cake is covered in buttercream you can use your scraper to smooth your frosting. Place your scraper against the side of the cake in a 45 degree angle. Don’t apply too much pressure and turn your turntable around. Clean the excess icing off your scraper regularly. When the sides of the cake are smooth, you can use your spatula to carefully remove excess frosting on the top of the cake.
- Put the cake in the fridge again to cool, at least for half an hour. To make sure that you can make your chocolate drip succesfully, it is important that the cake is cold.
The chocolate drip & decoration
- Put the cubes of chocolate into a heatproof bowl. Take a small pan and heat the whipping cream on the stove. Heat the cream until it almost starts bubbling (it shouldn’t cook).
- Pour the whipping cream on top of the chocolate and stir together until the chocolate has melted. Add a small cube of butter and stir until this has melted too.
- Take the cake out of the fridge.
- Take a tablespoon and carefully make drips on the side of the cake. I found this tutorial very helpful. After you have made the drips, spread a thin layer of chocolate over the top of the cake.
- Now decorate the cake with Oreo’s, the fruit and the flours. Do this when the chocolate is still wet because then it will stay in place after the chocolate has hardened.
Notes
- This is a very heavy cake. Therefore you can best cut it into small pieces. Because of the large amount of butter and sugar in the cake, I advise to take a small piece to avoid IBS complaints.
- You can easily make the cake layers one day in advance, store them in the fridge. The frosting can also be made beforehand.
- Do you have left-over frosting? You can freeze this and store it in the freezer up to three months.
- You can store left-overs of the gluten-free drip cake for a few days in the fridge. You can also easily freeze the cake.
- You might wonder: how do I cut this cake? To make it easy for yourself you can cut the cake into slices instead of into wedges. Simply cut off a rectangular slice on one side and cut that piece into three or four long slices.
- Prep Time: 5 hours
- Cook Time: 35 mins
- Category: Cake
Together we go for a calm belly!
Subscribe to the Karlijn's Kitchen e-mail newsletter for more tips and recipes and receive the ebook 10 things I wish I had known when I started the FODMAP diet for free!